Airwaves

RF Monitoring in the Ohio Valley

DSDPlus and Con+ Network Repeater Map

leave a comment

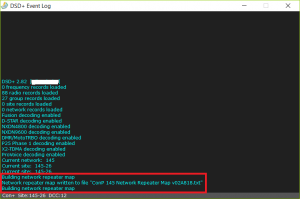
The latest (FastLane) versions of DSDPLus can capture a Con+ Network Repeater Map. If you want to see what it looks like when a Network Repeater Map is built, do this:

The raw audio file was captured directly on an LCN that was transitting the network repeater map. If I had been running DSDPlus in a trunking configuration, the copy of DSDPLus that monitors the CC would provide an additional repeating message that would indicate something like “A network repeater map is being broadcast on LCN #” and DSDPlus would have autotuned to the LCN and captured the map. You won’t see that in my example though, because I had tuned directly to the LCN which wasn’t the CC and captured the repeater map broadcast raw audio directly from that LCN.

Written by awadmin

April 19th, 2018 at 8:16 am

Posted in DSDPlus

Tagged with , ,

A post from RadioReference to save

leave a comment

http://forums.radioreference.com/unication-forum/368547-g5-phase-2-simulcast-tower-switching.html#post2913079

Whenever you are receiving a simulcast signal, there will be areas where there might be signal cancellation due to the phase difference between one site and another. This is similar to multi-path where one signal arrives directly to the receiver and another arrives later because it has been reflected from the ground or an object like a water tower or building. That phase difference causes the amplitude to drop*. I assume the “Bars” on the G5 respond to signal strength as I describe this. If they respond to bit error rate (BER), then the same multipath effect also results in a high bit error rate either by reduced amplitude, a phase difference in the bitstream or both.

Your radio is not “switching towers, it is responding to an aggregate of multiple signals.

To complicate this, in FM systems, there is a phenomenon called FM capture ratio which is a point where the receiver will favor the stronger signal and ignore the rest. In linear simulcast on narrow band channels, FM capture ratio requires a very large differential in signals, meaning you would need to be very close to a tower.

* In analog systems, while in motion, this multipath exhibits as a “picket fence” popping noise pulse at regular intervals. The higher the frequency (shorter wavelength) , the more frequent the noise.

I expect that when the Uniden SDS100 gets released, dipshits are going to immediately start comparing it to Unications and commercial radios, and somebody is going to find a time when their SDS100 just isn’t copying a simulcast with zero errors. Let this post serve as a reference that even the best radios out will have issues with simulcast. The difference between using a scanner that supports LSM (such as the SDS100) and a scanner that doesn’t (any scanner that came before the SDS100) is that you aren’t going to have to do antenna orientation magic or set up a fixed yagi to null out unwanted sites in the simulcast just to get a good decode — you will simply get a great decode normally. Instead of the norm being a shitty decode with occasional good copy, you’ll normally get great copy with occasional shitty decode.

Written by awadmin

April 9th, 2018 at 8:53 am

piaware — collecting data from dump1090 and forwarding to remote VRS

leave a comment

I run a piaware instance on an RPI3 here at home. I have a VPS at DigitalOcean running VRS (Virtual Radar Server). I had the need to get the Beast output from Dump1090 forwarded to the VRS box.

modesmixer2 ( from http://xdeco.org ) works perfectly for this task. With one instance of modesmixer2 I can connect to the local beast-output-port of Dump1090-FA on my RPI and then forward that data via an outbound connection to VRS on my VPS at DigitalOcean.

I could set it up so that modesmixer2 automatically starts, but I prefer to start up modesmixer2 manually after the RPI3 has been rebooted. And for this I use screen.

– RPI3 with Dump1090-fa listening for connections on localhost:30005 to output Beast results
– VRS on a remote VPS listening on TCP 30055 for an incoming connection

1. Install screen

sudo apt-get install screen

2. Make the directory for modesmixer2 to live

mkdir /home/pi/modesmixer2; cd /home/pi/modesmixer2

3. Download the RPI3 version modesmixer2 from http://www.xdeco.org

It’s a Google Drive link. So I had to download it to my PC and then upload it to my RPI3.

4. Unarchive the .tgz file into the /home/pi/modesmixer2 directory

5. Run screen with appropriate arguments

screen ./modesmixer2 –inConnect localhost:30005 –outConnect beast:104.###.###.###:30055

(once it is running, press CTRL-A then d to force screen into the background)

If I need to access the screen session later on, I simply type “screen -r”

Written by awadmin

August 14th, 2017 at 11:43 am

Posted in ADSB

Tagged with , , ,

Building rtl_biast on piaware 3.5

leave a comment

You may already have various things installed that I did not. I had to first do this:

sudo apt-get install cmake libusb-1.0.0-dev

Then, as the ‘pi’ user I did the following:

cd
git clone https://github.com/rtlsdrblog/rtl_biast
cd rtl_biast
mkdir build
cd build
cmake ..
make
cd src
./rtl_biast -b 1

When all finished, in /home/pi/rtl_biast/build/src there was rtl_biast

Sure, I could have done an sudo make install but chose not to install rtl_biast to a normal binary location. Instead I made note of its direct path, /home/pi/rtl_biast/build/src/rtl_biast

This FlightAware post provides directions (thanks to OBJ) on how to make rtl_biast fire before dump1090-fa is started so that the amp is enabled.

http://discussions.flightaware.com/post207274.html?hilit=rtl_biast#p207274

Remembering my previous note about where rtl_biast binary was deposited after the cmake, I did this:

sudo mkdir /etc/systemd/system/dump1090-fa.service.d
echo "[Service]" > /home/pi/bias-t.conf
echo "ExecStartPre=/home/pi/rtl_biast/build/src/rtl_biast -b 1" >> /home/pi/bias-t.conf
sudo mv /home/pi/bias-t.conf /etc/systemd/system/dump1090-fa.service.d/

Once you feel you’ve done everything correctly, reboot and then do:

sudo systemctl cat dump1090-fa.service

When you run that, note the output — specifically the last couple of lines. If you do not see the last three lines as shown below, you didn’t set up the ExecStartPre stuff properly.

Unit file of dump1090-fa.service changed on disk. Run ‘systemctl daemon-reload’.
# /lib/systemd/system/dump1090-fa.service
# dump1090-fa service for systemd

[Unit]
Description=dump1090 ADS-B receiver (FlightAware customization)
Documentation=https://flightaware.com/adsb/piaware/
Wants=network.target
After=network.target

[Service]
EnvironmentFile=/etc/default/dump1090-fa
EnvironmentFile=-/var/cache/piaware/location.env
User=dump1090
RuntimeDirectory=dump1090-fa
RuntimeDirectoryMode=0755
ExecStart=/usr/bin/dump1090-fa \
$RECEIVER_OPTIONS $DECODER_OPTIONS $NET_OPTIONS $JSON_OPTIONS $PIAWARE_DUMP1090_LOCATION_OPTIONS \
–write-json /run/dump1090-fa –quiet
Type=simple
Restart=on-failure
RestartSec=30
Nice=-5

[Install]
WantedBy=default.target

# /etc/systemd/system/dump1090-fa.service.d/bias-t.conf
[Service]
ExecStartPre=/home/pi/rtlstuff/rtl_biast/build/src/rtl_biast -b 1

That last three lines [in bold] have to be there. If they aren’t, then you know rtl_biast is not going to be triggered.

If all looks good, I’d recommend just doing a typical reboot of the device, or I suppose you could just restart dump1090-fa.
Written by awadmin

June 2nd, 2017 at 8:19 pm

Posted in Uncategorized

Tagged with , ,

SDRPlay RSP – VHF / UHF / Trunking mini review

2 comments

I recently purchased an SDRPlay RSP. Why? Only to see if the hype, which I did not believe, was true. I’ve got Airspys and R820T tuners already. My main interests are VHF/UHF digital signal decoding / trunking.

If your main interest is HF and you’re reading this mini-review, leave now. I have no use for HF / no desire to monitor HF. I don’t know nor care how the SDRPlay performs as a panadapter or anything else. It might be golden on HF. But that isn’t what this mini-review is about.

Why the SDRPlay is a fail for VHF/UHF digital decoding and trunking

  • Not supported by Unitrunker (as of 4-7-2016)
  • Not supported by DSDPlus (as of 4-7-2016)
  • Not supported by SDRTrunk (as of 4-7-2016)
  • Doesn’t handle adjacent channel interference as well as the Airspy
  • Doesn’t handle strong signal overload as well as the Airspy

For only $50 dollars more you can purchase the Airspy, which is supported by Unitrunker, DSDPlus, SDRTrunk, GNURadio / OP25, and pretty much any SDR software you can obtain on the internet. And if that isn’t enough of a reason, the Airspy simply outperforms the SDRPlay in every configuration / environment that I’ve used both devices.

No, I’m not posting numbers. I don’t have test equipment. I use the equipment and compare the equipment using the same computers, cables, jumpers, coax and antennae. And I’m totally convinced that the Airspy has better performance on VHF/UHF with regard to handling a band full of signals or strong signal overload.

If your opinion is different, oh well — You are entitled to it. If you don’t like my review, you can print it out and then wipe your ass with the paper if it makes you feel better.

Back to using my virtually bulletproof Airspys to trunktrack and record an LSM system while monitoring 6 control channels of a statewide trunking system.

Written by awadmin

April 8th, 2016 at 8:54 pm

libvolk.so.0.0.0: undefined reference to `volk_64u_popcnt_a_sse4_2′

leave a comment

A friend was attempting to build gnuradio on Linux Mint 17.1 32-bit. I run 64-bit Linux Mint and did not have this issue since it is specific to 32-bit builds.

If you’re attempting to build gnuradio on a 32-bit system system, whether it be Ubuntu or Mint or something else, you might not be able to build gnuradio without issues. This applies only to the latest gnuradio available as of 12/26/2014. The issue will probably be fixed in future versions.

To resolve this issue so that you can rebuild gnuradio, scroll to the bottom.

[ 22%] Built target gnuradio-pmt
[ 22%] Built target _pmt_swig_swig_tag
../lib/libvolk.so.0.0.0: undefined reference to `volk_64u_popcnt_a_sse4_2′
collect2: error: ld returned 1 exit status
make[2]: *** [volk/apps/volk-config-info] Error 1
make[1]: *** [volk/apps/CMakeFiles/volk-config-info.dir/all] Error 2
make[1]: *** Waiting for unfinished jobs….
[ 22%] Built target _blocks_swig0_swig_tag
../lib/libvolk.so.0.0.0: undefined reference to `volk_64u_popcnt_a_sse4_2′
collect2: error: ld returned 1 exit status
make[2]: *** [volk/apps/volk_profile] Error 1
make[1]: *** [volk/apps/CMakeFiles/volk_profile.dir/all] Error 2
libvolk.so.0.0.0: undefined reference to `volk_64u_popcnt_a_sse4_2′
collect2: error: ld returned 1 exit status
make[2]: *** [volk/lib/test_all] Error 1
make[1]: *** [volk/lib/CMakeFiles/test_all.dir/all] Error 2
make: *** [all] Error 2
Build failed. See output above for error messages.
billybob@billybob-ThinkCentre-XXXX ~/pybombs $

Solution (which I found here):

A fix for this is to change line 39 in volk/kernels/volk/volk_64u_popcntpuppet_64u.h

from

#ifdef LV_HAVE_SSE4_2

to

#if LV_HAVE_SSE4_2 && LV_HAVE_64

Written by awadmin

December 29th, 2014 at 10:17 am

Posted in gnuradio,Linux Mint

Tagged with , ,

Installing Linux Mint 17.1 64-bit on a VMWare Workstation VM

leave a comment

Installation Platform: Dell Inspiron 17R laptop, 3rd-gen Intel i7-3612QM @ 2.1 Ghz, 8 GB of RAM and a 256 GB Crucial SSD with Windows 7 Professional as the host.

I decided I’d install a trial version of VMWare Workstation 11. It’s a 30-day trial, and I’m sure I’ll buy it before the trial period is up simply because it’s a great product.

In order to install a 64-bit guest OS on VMWare Workstation, the host machine itself has to be running a 64-bit processor that supports virtualization and has that support enabled. When initially installing VMWare Workstation, it does not ask you to boot afterwards. But if you attempt to create a 64-bit guest OS VM, it won’t let you. I ended up rebooting my machine, and then I was able to to create a 64-bit guest OS (I specified that Ubuntu 64-bit was going to be installed). I specified a guest host with 2 GB of RAM and usage of 1 CPU core, although I’m likely to up those figures later on.

I then put in the Linux Mint 17.1 CD, booted up the VM into the LiveCD of Linux Mint, and started the installation. Installation of Mint took about 22 minutes. Next step was updating the Update Manager and then updating existing software for which the Update Manager indicated there were updates available. This part of the process is quick on my machine, but for the fact that the Mint update server that I was connect to was slow as molasses during the updates. Incidentally, there were 350 MB worth of updates. The download / installation of the updates took 13 minutes.

So in total, it took me about 40 minutes to set up the VM, install and update Linux Mint.

Now on to installing the things I’m interested in, such as git, pybombs, gnuradio, gqrx, and gr-OP25.

UPDATE 01-01-2015: Happy New Year! I gave up on using VMWare Workstation for the job. Technically, there was no issue. But VMWare Workstation takes over your whole machine, with a gazillion resource-hogging services running even when you don’t have VMW open. I don’t like that. I run a fast machine with SSD drives because I like the system to be responsive. VMWare Workstation is totally counterproductive to that. After having uninstalled the whole VMWare Workstation suite of shit, it’s onward and upward to VirtualBox + Linux Mint 17 64-bit.

Written by awadmin

December 25th, 2014 at 2:23 pm

Posted in Linux Mint

Tagged with ,

Error when installing gqrx on Linux Mint 17.1

leave a comment

I’m running Linux Mint 17.1 and had already installed git, pybombs, gnuradio, and OP25 per instructions kingly given by PiccoIntegra in throughout this thread on the RadioReference forums.

I decided I wanted to install gqrx.   Should be simple.   Switch to your ~/pybombs directory and type in:

./pybombs install gqrx

However, for me it wasn’t quite so easy.   After doing this, the installation failed with the following information below.

mike@LinuxMint ~/pybombs $ ./pybombs install gqrx
Settled on prefix: /home/mike/target
Loading recipes …
Installing packages:
* gqrx
Installing from source: gqrx
Configuring: (100%) [==========================================================]
Building:    (100%) [==========================================================]
Build failed. Re-trying with reduced makewidth and higher verbosity.
g++ -m64 -Wl,-O1 -o gqrx main.o mainwindow.o receiver.o remote_control.o remote_control_settings.o cafsk12.o costabf.o agc_impl.o correct_iq_cc.o lpf.o resampler_xx.o rx_demod_am.o rx_demod_fm.o rx_fft.o rx_filter.o rx_meter.o rx_agc_xx.o rx_noise_blanker_cc.o sniffer_f.o stereo_demod.o udp_sink_f.o afsk1200win.o agc_options.o audio_options.o bookmarks.o bookmarkstablemodel.o bookmarkstaglist.o demod_options.o dockaudio.o dockbookmarks.o dockinputctl.o dockfft.o dockrxopt.o freqctrl.o ioconfig.o iq_tool.o meter.o nb_options.o plotter.o qtcolorpicker.o nbrx.o receiver_base.o wfmrx.o pa_device_list.o pa_sink.o pa_source.o moc_mainwindow.o moc_remote_control.o moc_remote_control_settings.o moc_cafsk12.o moc_afsk1200win.o moc_agc_options.o moc_audio_options.o moc_bookmarks.o moc_bookmarkstablemodel.o moc_bookmarkstaglist.o moc_demod_options.o moc_dockaudio.o moc_dockbookmarks.o moc_dockfft.o moc_dockinputctl.o moc_dockrxopt.o moc_freqctrl.o moc_ioconfig.o moc_iq_tool.o moc_meter.o moc_nb_options.o moc_plotter.o moc_qtcolorpicker.o qrc_icons.o qrc_textfiles.o    -L/usr/lib/x86_64-linux-gnu -lboost_system-mt -lboost_program_options-mt -lrt -lpulse-simple -lpulse -L/home/mike/target/lib -lgnuradio-analog -lgnuradio-filter -lgnuradio-fft -lgnuradio-osmosdr -lgnuradio-blocks -lgnuradio-runtime -lgnuradio-pmt -lQtGui -lQtNetwork -lQtCore -lpthread
/usr/bin/ld: cannot find -lboost_system-mt
/usr/bin/ld: cannot find -lboost_program_options-mt
collect2: error: ld returned 1 exit status
make: *** [gqrx] Error 1
Build failed. See output above for error messages.

So, I did some searching on the internet and found out that unless you compiled libboost stuff from source, the -mt is no longer needed.

To fix this issue:

  1. Edit ~/pybombs/recipes/gqrx.lwr, make the following change, and then save:
  2. Change:   qmake BOOST_SUFFIX=-mt

    To:   qmake BOOST_SUFFIX=

  3. Change back to your pybombs directory
  4. mike@LinxMinut ~ $ cd ~/pybombs

  5. clean the previous build data for gqrx and then rebuild gqrx
  6. mike@LinuxMint ~/pybombs $ ./pybombs clean gqrx
    Settled on prefix: /home/mike/target
    Loading recipes …
    cleaned local gqrx
    mike@LinuxMint ~/pybombs $ ./pybombs rb gqrx
    Settled on prefix: /home/mike/target
    Loading recipes …
    Installing packages:
    * gqrx
    Installing from source: gqrx
    Cloning into ‘gqrx’…
    remote: Counting objects: 5243, done.
    remote: Total 5243 (delta 0), reused 0 (delta 0)
    Receiving objects: 100% (5243/5243), 4.19 MiB | 896.00 KiB/s, done.
    Resolving deltas: 100% (2802/2802), done.
    Checking connectivity… done.
    Configuring: (100%) [==========================================================]
    Building:    (100%) [==========================================================]
    Installing: (100%) [===========================================================]
    installation ok via: src

  7. Run gqrx and have fun

mike@LinuxMint ~ $ gqrx


Written by awadmin

December 25th, 2014 at 12:40 am

Posted in gqrx

Tagged with , , ,